Hey there, fellow developer! In this tutorial, I’ll walk you through building an awesome Tic Tac Toe game using Blazor WebAssembly. So grab your coding gear, and let’s get started!
To check the full source code, you can visit github/mhdbouk/tictactoe-blazor.
Step 1: Set Up the Blazor WebAssembly Project
First things first, we need to set up a new Blazor WebAssembly project. Do your thing with the command line or your favorite IDE like Visual Studio or Visual Studio Code. Get that project ready for some Tic Tac Toe action!
dotnet new blazorwasm-empty -o TicTacToe
Step 2: Create the Game Board Component
Now, we have to create a component to show off the game board. We want a 3x3 grid where players can make their moves. So go ahead and create a new component called `GameBoardComponent`.
Inside the razor file component, we will create three divs for rows. Inside each of these divs, we will have three different divs for the columns.
<div>
    <div>1</div>
    <div>2</div>
    <div>3</div>
</div>

<div>
    <div>4</div>
    <div>5</div>
    <div>6</div>
</div>

<div>
    <div>7</div>
    <div>8</div>
    <div>9</div>
</div>

@code {

}
Add the following import inside _imports.razor
@using TicTacToe
@using TicTacToe.Components
Now, we need to add the GameBoardComponent inside our main Pages/Index.razor. Replace the content of the file with the following:
@page "/"

<GameBoardComponent></GameBoardComponent>
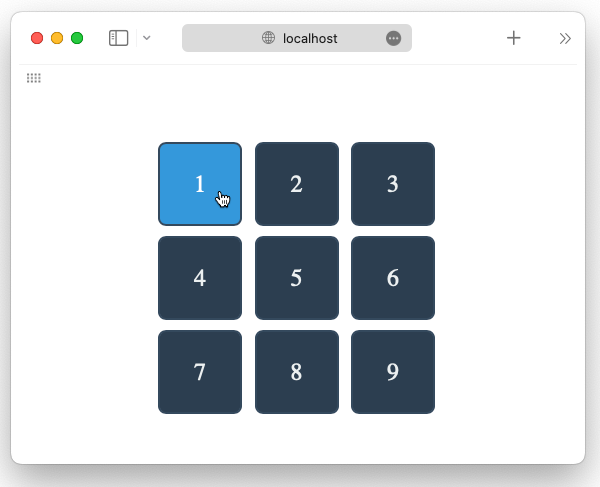
Run the application, you should see something like this:
Let us add a few CSS styles to make it look better. Open wwwroot/css/app.css and add the following
ChatGPT wrote the following CSS, so if you have any feedback, please let me know how we can make it better in the comments below!
.game-container {
    width: 300px;
    margin: 50px auto 0;
}

/* Style each row */
.row {
    display: grid;
    grid-template-columns: repeat(3, 1fr);
    gap: 10px;
    margin: 10px;
}
/* Style the individual cells */
.row div {
    width: 80px;
    height: 80px;
    display: flex;
    align-items: center;
    justify-content: center;
    background-color: #2c3e50;
    font-size: 24px;
    color: #ecf0f1;
    border: 2px solid #34495e;
    border-radius: 8px;
    cursor: pointer;
    transition: background-color 0.3s, color 0.3s;
}

/* Add hover effect */
.row div:hover {
    background-color: #3498db; /* Brighter blue on hover */
    color: #ffffff; /* White text on hover */
}
And now we have something like this
Step 3: Implement the User Logic
Alright, now it’s time to add some brains to our game. We need to implement the game logic, so it can keep track of what’s happening. You know, figuring out the game state, handling player moves, and checking for a winner.
In your project, create a new class file called GameBoardComponent.razor.cs. This class will contain the C# code for the GameBoardComponent component. Here’s an example of how it can be structured:
using Microsoft.AspNetCore.Components;

namespace TicTacToe.Components;

public partial class GameBoardComponent : ComponentBase
{
    protected override void OnInitialized()
    {
        base.OnInitialized();
        Console.WriteLine("Init");
    }
}
This separation allows you to keep the C# code separate from the Razor code, making it easier to maintain and understand.
First, Let us remove the duplicates code in the razor file, by using nested for loops we can create the boxes without having to duplucated the html. Replace the razor code in GameBoardComponenet.razor with the following code:
<div class="game-container">
    @for (int i = 0; i < 3; i++)
    {
        <div class="row" id="@i">
            @for (int j = 0; j < 3; j++)
            {
                int row = i;
                int col = j;
                <div id="column-@row-@col"></div>
            }
        </div>
    }
</div>
And now, let us add the Click event, when the user click on the boxes we need to capture the box id and display it in a console log:
GameBoardComponent.razor:
<div class="game-container">
    @for (int i = 0; i < 3; i++)
    {
        <div class="row" id="@i">
            @for (int j = 0; j < 3; j++)
            {
                int row = i;
                int col = j;
                <div @onclick="() => BoxClicked(row, col)" id="column-@row-@col"></div>
            }
        </div>
    }
</div>
And add the following method into the GameBoardComponent.razor.cs:
using Microsoft.AspNetCore.Components;

namespace TicTacToe.Components;

public partial class GameBoardComponent : ComponentBase
{
    protected override void OnInitialized()
    {
        base.OnInitialized();
        Console.WriteLine("Init");
    }

    private void BoxClicked(int row, int col)
    {
        Console.WriteLine($"Box clicked at {row},{col}");
    }
}
In this blog, we are going to assume that the user input is always the first one, and he is using X, the AI will use O as an input.
For that, let us update our code by adding a 2 dimensional array of strings.
GameBoardComponent.razor.cs:
using Microsoft.AspNetCore.Components;

namespace TicTacToe.Components;

public partial class GameBoardComponent : ComponentBase
{
    // Add 2 dimensional array
    private string[,] _board = new string[3, 3];
    protected override void OnInitialized()
    {
        base.OnInitialized();
        Console.WriteLine("Init");
    }

    private void BoxClicked(int row, int col)
    {
        // Return if there is an existing value
        if (_board[row, col].Length > 0)
        {
            return;
        }

        // Set the value as X (user option)
        _board[row, col] = "x";

        // Call this method to let the AI play its turn
        NextTurn();
    }
}
And in the GameBoardComponent.razor file:
<div class="game-container">
    @for (int i = 0; i < 3; i++)
    {
        <div class="row" id="@i">
            @for (int j = 0; j < 3; j++)
            {
                int row = i;
                int col = j;
                // Display the value in the array
                <div @onclick="() => BoxClicked(row, col)" id="column-@row-@col">@_board[row, col]</div>
            }
        </div>
    }
</div>
NextRun() is basically the AI turn, it will be triggered after the user checks a box.
Step 4: Implement the AI Logic
To create an enjoyable AI experience, it is crucial to develop a logic that provides a balanced challenge to players. While the AI should offer a fair gameplay experience, it should also present a reasonable level of difficulty that allows players to win with skill and strategy.
Let us start by implementing the NextTurn method to handle the AI’s turn and check for a winner after each move. The AI should first check if it has any winning move, or if it has any user winning move to block, and if not, it should randomly pick a box.
Here’s an updated version of the GameBoardComponent class that includes the NextTurn method:
...
private void NextTurn()
{
    var (row, col) = GetWinningMove("O");
    if ((row, col) == (null, null))
    {
        (row, col) = GetWinningMove("X");
        if ((row, col) == (null, null))
        {
            (row, col) = RandomTurn();
        }
    }

    _events.Add($"AI placed O at {row},{col}");
    _board[row!.Value, col!.Value] = "O";
}
...
Within the BoxClicked function, once the user has made their move, we proceed to invoke the NextTurn function to transition to the AI’s turn. Inside this NextTurn function, we first check for the AI’s winning move by using the GetWinningMove("o") method. If no winning move is found, we then search for the user’s winning move using GetWinningMove("X") to block the user from winning. In the event that neither a winning move for the AI nor the user is identified, we resort to generating a random move for the AI.
This is the implementation of GetWinningMove method:
private (int? row, int? col) GetWinningMove(string player)
{
    for (int row = 0; row < 3; row++)
    {
        for (int col = 0; col < 3; col++)
        {
            if (_board[row, col] == null)
            {
                _board[row, col] = player;
                if (CheckWinner(player))
                {
                    return (row, col);
                }
                _board[row, col] = null; // Reset the move if it didn't result in a win
            }
        }
    }

    return (null, null);
}
And the following is the implementation of RandomTurn method
private (int row, int col) RandomTurn()
{
    var row = RandomNumberGenerator.GetInt32(0, 3);
    var col = RandomNumberGenerator.GetInt32(0, 3);
    return _board[row, col] == null ? (row, col) : RandomTurn();
}
When it comes to generating random numbers, it is recommended to use the RandomNumberGenerator class instead of the Random class. This is because RandomNumberGenerator provides a more secure and cryptographically strong source of randomness, making it suitable for applications that require high levels of randomness and security.
Step 5: Check for a Winner
Now that we have implemented the game logic for the user and the AI, let’s add the necessary code to check for a winner after each move. We want to determine whether there is a winning combination on the game board.
Update the GameBoardComponent class with the following code:
private bool CheckWinner(string player)
{
    // Check rows
    for (int row = 0; row < 3; row++)
    {
        if (_board[row, 0] == player && _board[row, 1] == player && _board[row, 2] == player)
            return true;
    }

    // Check columns
    for (int col = 0; col < 3; col++)
    {
        if (_board[0, col] == player && _board[1, col] == player && _board[2, col] == player)
            return true;
    }

    // Check diagonals
    if ((_board[0, 0] == player && _board[1, 1] == player && _board[2, 2] == player) ||
        (_board[0, 2] == player && _board[1, 1] == player && _board[2, 0] == player))
    {
        return true;
    }

    return false;
}

private bool CheckTie()
{
    for (int row = 0; row < 3; row++)
    {
        for (int col = 0; col < 3; col++)
        {
            if (_board[row, col] == null)
            {
                return false;
            }
        }
    }

    return true;
}
In this code, we check for a winning combination by iterating through each row, column, and diagonal on the game board. If we find a sequence of three matching symbols for the given player, we return true, indicating that the player has won.
To check for a tie: we can iterate through all the cells and verify if each one contains data. If all cells are filled, you can consider it a tie. Make sure to call this method after checking for winners.
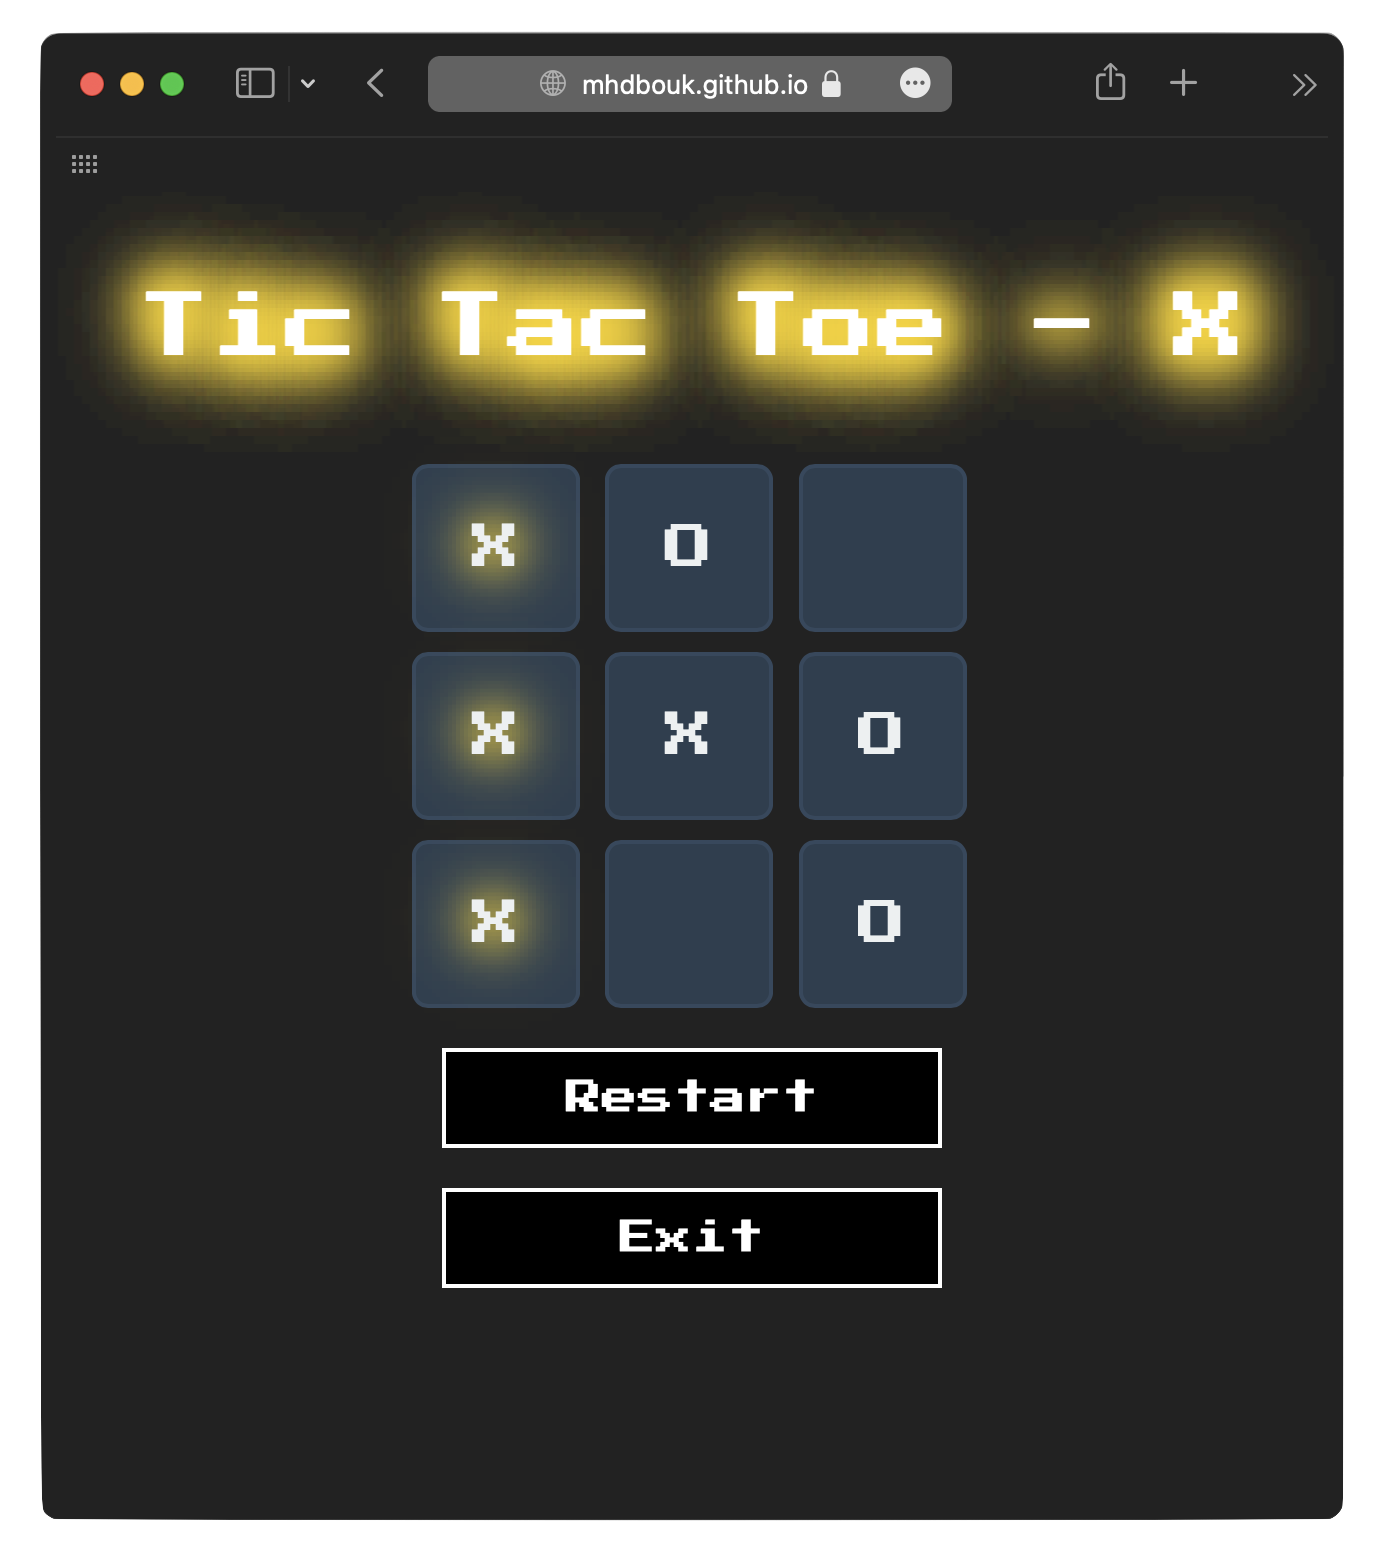
Additional Enhancements
Congratulations! You have successfully built a Tic Tac Toe game using Blazor WebAssembly. But don’t stop here. Here are a few more enhancements you can make to take your game to the next level:
-
Add a restart game button to allow the players to start a new game without refreshing the page.
-
Add animations and transitions to make the game more visually appealing.
-
Implement a multiplayer mode using SignalR to allow users to play against each other over the internet.
Feel free to experiment and add your own creative touches to make the game even more exciting!
Conclusion
In this tutorial, you have learned how to build a Tic Tac Toe game using Blazor WebAssembly. You have set up the project, created the game board component, implemented the user and AI logic, and added the game outcome checking. By following the steps and enhancements mentioned, you can create a fully functional Tic Tac Toe game with a visually appealing user interface.
I hope you have enjoyed this tutorial and found it helpful. Happy coding and have fun playing Tic Tac Toe!