
Hey there friends! If you are a .NET developer who loves to create console applications, you might have wondered how to make them more appealing and user-friendly. Sure, you can use Console.WriteLine and Console.ReadLine to output some text and get some input, but that’s pretty boring and limited. What if you want to display some colors, styles, tables, trees, progress bars, or even ASCII images? What if you want to parse command-line arguments and create complex commands like git, npm, or dotnet?
That’s where Spectre.Console comes in handy. Spectre.Console is a .NET library that makes it easier to create beautiful console applications. It is heavily inspired by the excellent Rich library for Python written by Will McGugan. It supports 3/4/8/24-bit colors in the terminal with auto-detection of the current terminal’s capabilities. It also provides a rich markup language that lets you easily output text with different colors and styles such as bold, italic, and blinking. So grab a cup of coffee and let’s dive in!
In this blog post, I will show you how to use Spectre.Console to create some awesome console applications with minimal code.
Installing Spectre.Console
To install Spectre.Console, you need to use NuGet Package Manager. You can either use Visual Studio or the dotnet CLI tool.
If you are using Visual Studio, right-click on your project and select Manage NuGet Packages. Then search for Spectre.Console and install it.
If you are using dotnet CLI tool, run this command in your project folder:
dotnet add package Spectre.ConsoleYou can also specify the version number if you want:
dotnet add package Spectre.Console --version 0.49.1Using Spectre.Console
To use Spectre.Console, you need to import its namespace:
using Spectre.Console;Then you can access its main class AnsiConsole, which provides various methods for outputting text and rendering widgets.
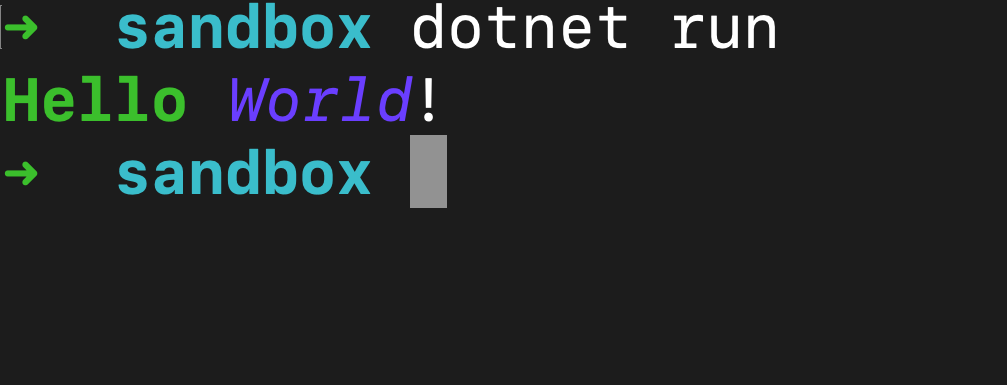
For example, here is how you can output some text with different colors and styles:
AnsiConsole.MarkupLine("[bold green]Hello[/] [italic blue]World[/]!");This will produce something like this:
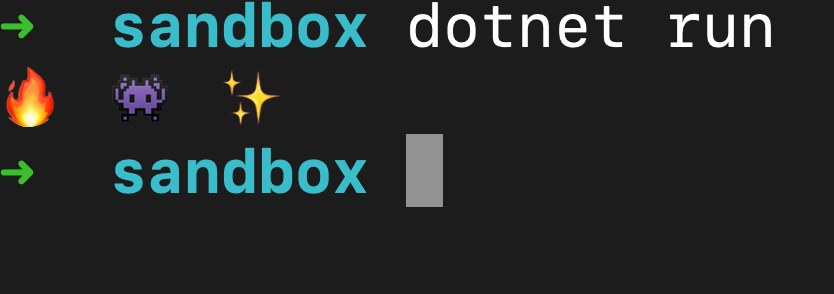
You can also use emojis or Unicode characters in your markup:
AnsiConsole.MarkupLine(":fire: :alien_monster: :sparkles:");
This will produce something like this:
Also, you can use RGB or HEX values for specifying colors:
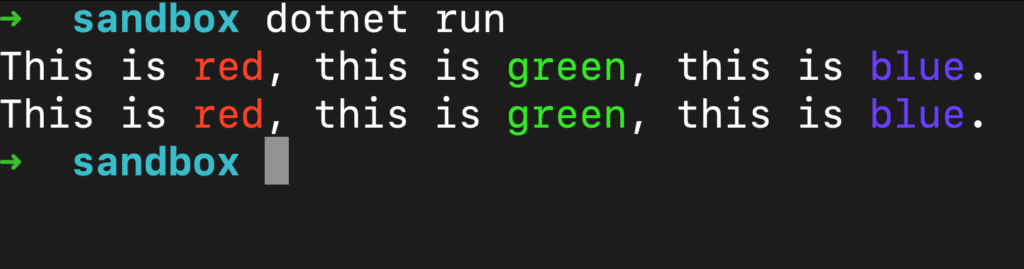
AnsiConsole.MarkupLine("This is [rgb(255,0,0)]red[/], this is [rgb(0,255,0)]green[/], this is [rgb(0,0,255)]blue[/].");
AnsiConsole.MarkupLine("This is [#ff0000]red[/], this is [#00ff00]green[/], this is [#0000ff]blue[/].");
This will produce something like this:
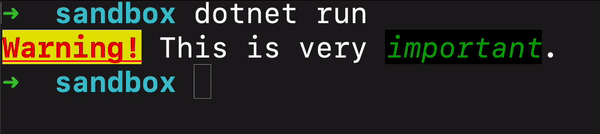
You can also nest tags for combining colors and styles:
AnsiConsole.MarkupLine("[bold red on yellow blink underline]Warning![/] This is very [italic green on black strikethrough]important[/].");
This will produce something like this (depending on your terminal support):
You can find more details about the markup language syntax here: https://spectreconsole.net/markup
Rendering widgets
Spectre.Console also provides various widgets that you can render in your console applications. Some of them are:
- Tables: Display tabular data with customizable headers, footers, borders, and alignment.
- Trees: Display hierarchical data with expandable nodes and icons.
- Bar Chart: Display a horizontal bar chart on the console.
- Progress: Display progress for long-running tasks with live updates of progress bars and status controls.
- and many others
Here are some examples of how to render these widgets:
Tables
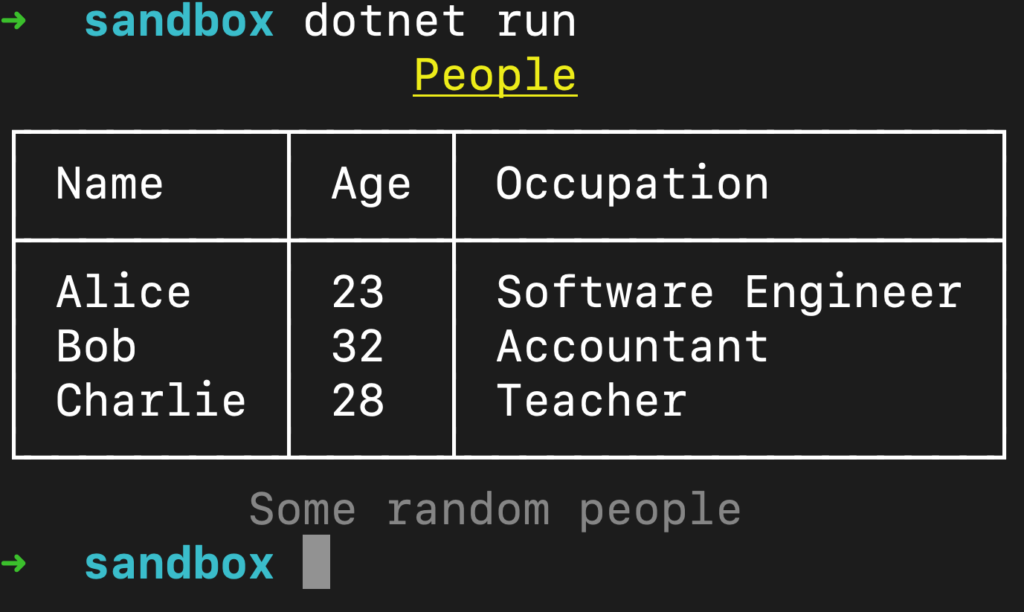
To render a table, you need to create an instance of Table class and add some columns and rows. You can also customize its appearance by setting properties such as BorderStyle, Border, Title, Caption, etc.
For example,
var table = new Table();
table.AddColumn("Name");
table.AddColumn("Age");
table.AddColumn("Occupation");

table.AddRow("Alice", "23", "Software Engineer");
table.AddRow("Bob", "32", "Accountant");
table.AddRow("Charlie", "28", "Teacher");

table.Title = new TableTitle("[underline yellow]People[/]");
table.Caption = new TableTitle("[grey]Some random people[/]");

AnsiConsole.Write(table);
This will produce something like this:
You can find more details about the table widget here: https://spectreconsole.net/widgets/table
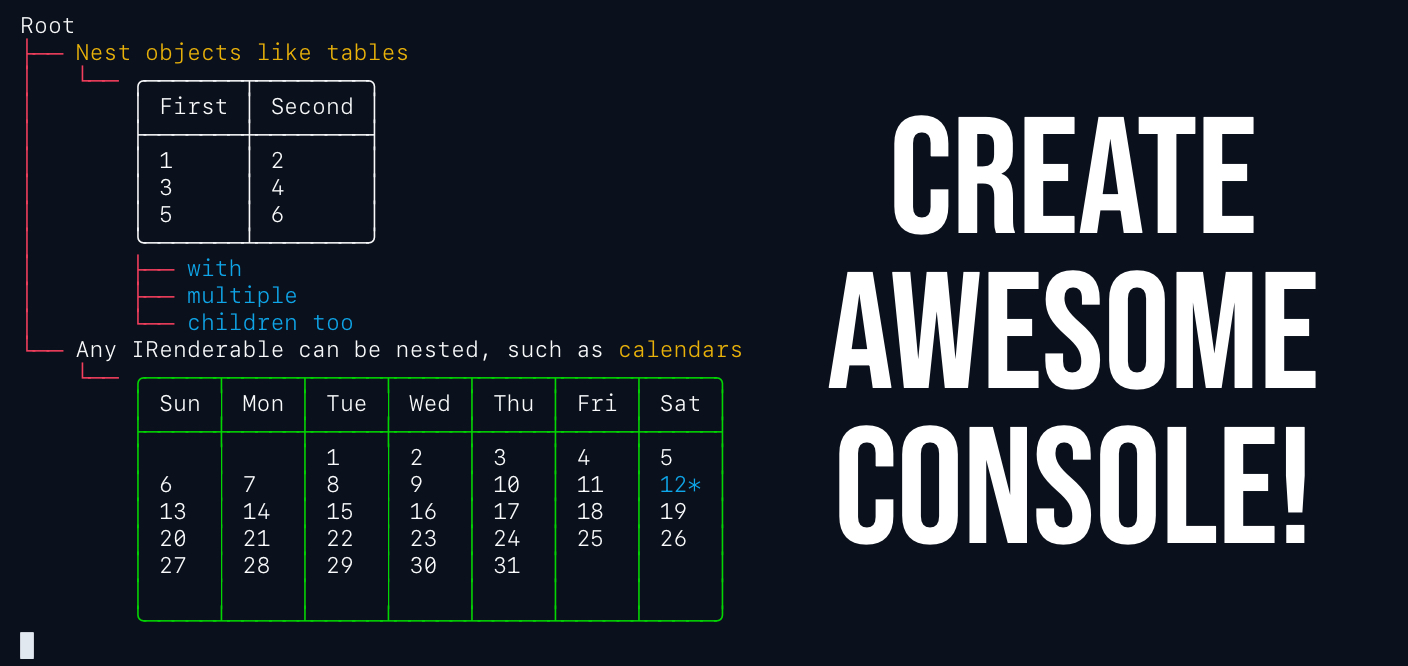
Trees
To render a tree, you need to create an instance of Tree class and add some nodes. You can also customize its appearance by setting properties such as Style, Guide, Expand, etc.
For example,
var tree = new Tree("[yellow]Root[/]");

var child1 = tree.AddNode(new Markup("[green]Child 1[/]"));
var child2 = tree.AddNode(new Markup("[green]Child 2[/]"));
var child3 = tree.AddNode(new Markup("[green]Child 3[/]"));

child1.AddNode("[blue]Grandchild 1-1[/]");
child1.AddNode("[blue]Grandchild 1-2[/]");

child2.AddNode("[green]Grandchild 2-1[/]");

var grandchild3 = child3.AddNode("[green]Grandchild 3-1[/]");
child3.AddNode("[green]Grandchild 3-2[/]");
grandchild3.AddNode("[yellow]Great Grandchild 3-1-1[/]");
grandchild3.AddNode("[yellow]Great Grandchild 3-1-2[/]");

AnsiConsole.Write(tree);
This will produce something like this:

You can find more details about the tree widget here: https://spectreconsole.net/widgets/tree
Progress
To render progress, you need to create an instance of Progress class and add some tasks. You can also customize its appearance by setting properties such as AutoClear, AutoRefresh, Columns, etc.
For example,
await AnsiConsole.Progress()
    .StartAsync(async ctx =>
    {
        // Define tasks
        var task1 = ctx.AddTask("[green]Chrome RAM usage[/]");
        var task2 = ctx.AddTask("[yellow]VS Code RAM usage[/]");

        while (!ctx.IsFinished)
        {
            // Simulate some work
            await Task.Delay(100);

            // Increment
            task1.Increment(4.5);
            task2.Increment(2);
        }
    });
This will produce something like this:
You can find more details about the progress widget here: https://spectreconsole.net/live/progress
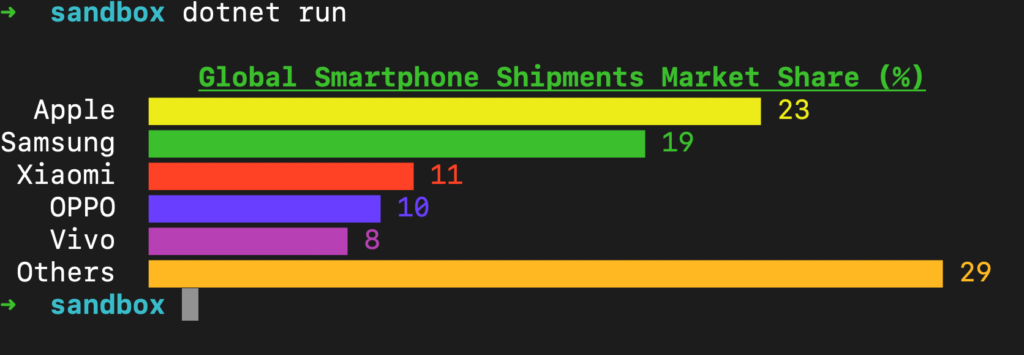
Bar Chart
To render a bar chart, you need to create an instance of BarChart class and add some items with labels, values, and colors. You can also customize its appearance by setting properties such as Width, Label, CenterLabel, etc.
AnsiConsole.Write(new BarChart() // Create a bar chart
    .Width(60)
    .Label("[green bold underline]Global Smartphone Shipments Market Share (%)[/]") // Set the label of the chart
    .CenterLabel() //And center it
    .AddItem("Apple", 23, Color.Yellow) // Add the items with lables, values, and colors
    .AddItem("Samsung", 19, Color.Green)
    .AddItem("Xiaomi", 11, Color.Red)
    .AddItem("OPPO", 10, Color.Blue)
    .AddItem("Vivo", 8, Color.DarkMagenta)
    .AddItem("Others", 29, Color.Orange1));
This will produce something like this:
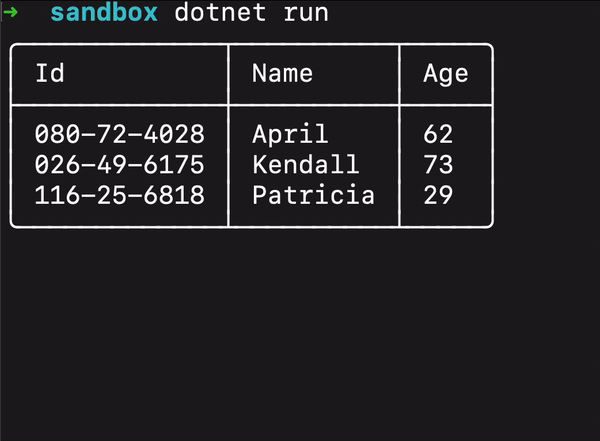
Using Live Display
Spectre.Console can update arbitrary widgets in place using the Live Display widget.
This can be useful for creating dynamic tables that show changing data over time. The live display is not thread-safe, and using it together with other interactive components such as prompts, status displays, or other progress displays is not supported.
To render a live table, you need to create a Table instance and add some columns and rows. Then you need to pass the table to AnsiConsole.Live() method and call Start() or StartAsync() with an action or a function that updates the table content. You can use ctx.Refresh() to refresh the display after each update.
// Create a table
var table = new Table()
    .Border(TableBorder.Rounded)
    .AddColumn("Id")
    .AddColumn("Name")
    .AddColumn("Age");

// Add some initial rows
table.AddRow(Faker.Identification.SocialSecurityNumber(), Faker.Name.First(),
    Faker.RandomNumber.Next(18, 99).ToString());
table.AddRow(Faker.Identification.SocialSecurityNumber(), Faker.Name.First(),
    Faker.RandomNumber.Next(18, 99).ToString());

// Use LiveDisplay to update the table
await AnsiConsole.Live(table)
    .StartAsync(async ctx =>
    {
        // Loop until we are done
        for (int i = 0; i < 5; i++)
        {
            var id = Faker.Identification.SocialSecurityNumber();
            var name = Faker.Name.First();
            var age = Faker.RandomNumber.Next(18, 99);
            table.AddRow(id, name, age.ToString());

            ctx.Refresh();

            // Simulate doing the work
            await Task.Delay(1000);
        }
    });
I’m using Faker.Net to generate some data in the example above. More about Faker.Net here
This will produce something like this:
Conclusion
In this blog post, I showed you how to use Spectre.Console to create beautiful console applications with minimal code. You learned how to output text with colors and styles, render widgets such as tables, trees, progress bars, and charts, and display live tables
Spectre.Console is a powerful and versatile library that can help you create amazing console applications that are easy to use and maintain. I hope you enjoyed this blog post and found it useful. If you have any questions or feedback, feel free to leave a comment below or reach out to me on Twitter @mhdbouk.
Thank you for reading and happy coding! 😊👨💻
Sounds promising. I want to follow step by step and implement this. Great job!
Great article, might consider adding something about
exceptions and Mark.Escape
sir,
i am trying to use spectre.console. display color text is ok. but when involing line,table etc. it display characters instead of line.
pls advise
It could be related to your terminal settings and encoding, are you still facing this issue?